https://developer.android.com/guide/topics/ui/notifiers/notifications
알림 개요 | Android 개발자 | Android Developers
알림 개요 알림은 사용자에게 미리 알림을 주고 다른 사람과의 소통을 가능하게 하며 앱에서 보내는 기타 정보를 적시에 제공하기 위해 Android가 앱의 UI 외부에 표시하는 메시지입니다. 사용자
developer.android.com
0. 알림의 형태
먼저 안드로이드의 Notification의 형태에 대해 알아보자
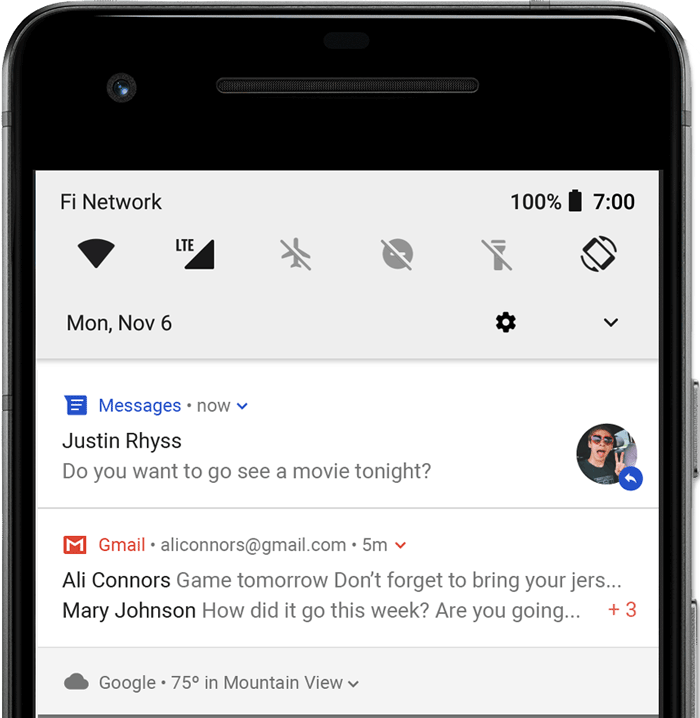
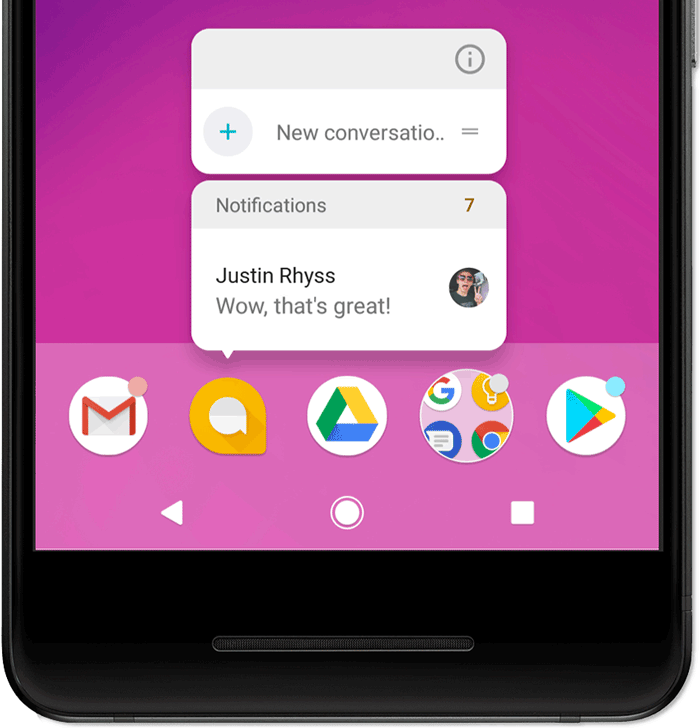
1. Status bar and notification drawer 상태바에 나타나는 알림
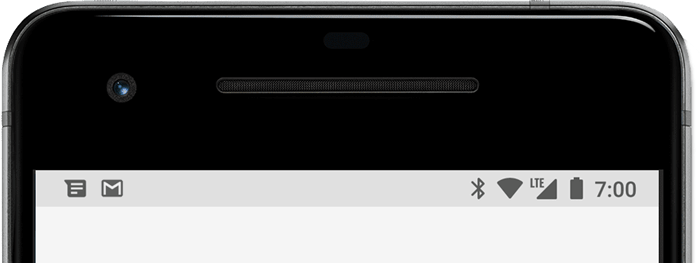
맨 위에 상태바에 나타나는 알림이다. 유저가 상단을 드래그하여 끌어 내리면 아래처럼 알림을 자세히 확인 가능하다
Heads-up notification 상단에 나타나는 알림
안드로이드 5.0부터 지원되었으며 디바이스가 잠금해제 되어있을 때 만 나타난다.
Lock Screen 잠금화면 알림
안드로이드 5.0부터 지원. 잠금화면 상태에서도 알림을 나타낼 수 있다.
또한 secure lock screen(보안잠금)에 따라 visible 상태를 지정 해 줄 수 있다.
즉 보안잠금하면 알림을 지문인식같은거롤 해제하기 전 까지 안보여주거나 아니면 그냥 보여주는거를 프로그래밍으로 설정할 수 있다.
App Icon badge 앱아이콘 알림
안드로이드 8.0부터 지원하며 앱아이콘을 꾹 누르면 나오는 알림이다.
1. Notification anatomy 알림 디자인 해부

- Small Icon : setSmallIcon() 함수로 설정 가능하다
- App name : 안드로이드에서 자체적으로 제공해준다
- Time stamp : 안드로이드에서 자체적으로 제공해준다.
setWhen()함수로 override 할 수 있고 setShowWhen(false)로 감출수도 있다 - Lage Icon : Optional한 요소이다. setLargeIcon() 함수로 설정가능하다
- Title : Optional이다 setContentTitle() 로 설정 가능하다
- Text : Optional이다 setContentText() 로 설정 가능하다
2. Notification Actions 알림 액션
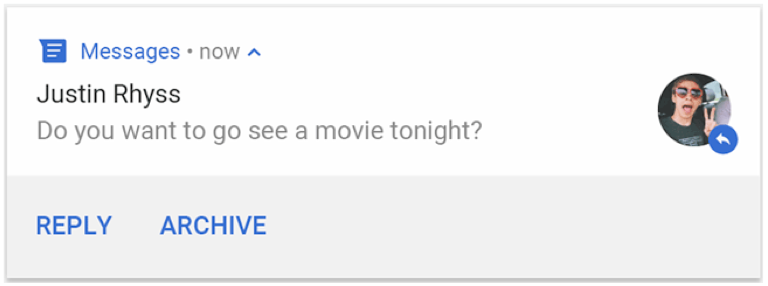
필수는 아니지만 알림은 알림을 탭 하였을 때 적절한 app activity를 호출해야 하며 이러한 작업은 default action으로 간주된다.
default action에 추가하여 알림에 acttion button을 달아 줄 수 있다.
Android 7.0(API level 24) 이상부터는 reply action 버튼을 추가해 줄 수 있다. 이는 알림에서 텍스트를 입력하여 메세지를 보내는 기능을 한다
Android 10(API level 29) 이상부터는 안드로이드에서 suggested intent-base actions 기반으로 action button을 자동 생성해준다.
3. Notification Channels 알림 채널
안드로이드 8.0 이상부터는 모든 알림은 반드시 채널이라는 것을 부여해야 한다.
알림에 채널을 부여하여 categorizing 함으로 써, 유저는 특정알림을 disable하거나 visual, auditory option을 각 채널마다 설정 할 수 있다. 또한 long press 에 대한 설정을 각 채널마다 부여할 수 있다.
4. 본격적으로 알림 만들기
먼저 build.gradle에 디펜던시를 추가하자
val core_version = "1.6.0"
dependencies {
    implementation "androidx.core:core:$core_version"
}
위와같이 기본적인 알림을 만들어 볼 것이다.
먼저 알림에 content와 channel을 설정해 주어야 한다. 이는 NotificationCompat.Builder 객체를 이용한다.
앞서 배운 anatomy를 기준으로 설명하면 다음과 같다
- small icon은 setSmallIcon()을 이용하며 required 항목이다
- title은 setContentTitle() 함수를 이용한다
- body text는 setContentText() 함수를 이용한다
알림에는 priority라는 개념이 있다. 알림을 얼마나 예의없게(?) 알리냐의 정도인데 priority가 높을수록 배짱까고 눈치없이 알림을 띄운다.
안드로이드 7.0이하에서는 setPriority를 사용하고, 8.0이상에서는 channel importance라는걸 사용한다.
아래는 7.0이하의 버전과 호환을 위해 setPriority를 사용한 모습
var builder = NotificationCompat.Builder(this, CHANNEL_ID)
        .setSmallIcon(R.drawable.notification_icon)
        .setContentTitle(textTitle)
        .setContentText(textContent)
        .setPriority(NotificationCompat.PRIORITY_DEFAULT)
NotificationCompat.Builder builder = new NotificationCompat.Builder(this, CHANNEL_ID)
.setSmallIcon(R.drawable.notification_icon)
.setContentTitle(textTitle)
.setContentText(textContent)
.setPriority(NotificationCompat.PRIORITY_DEFAULT);
여기서 주목할점은 NotificationCompat.Builder는 Channel ID를 요구하며 개발자가 직접 입력해 주어야 한다.
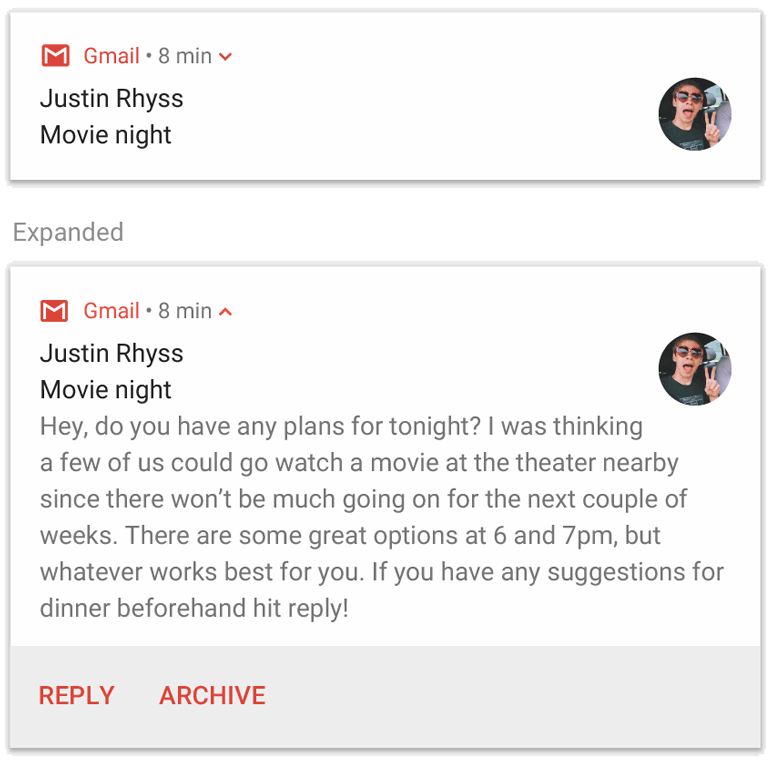
기본적으로 알림은 online으로 축약되어 나타난다. 만약 이 한줄을 좀더 길게 만들고 싶다면 setStyle() 을 이용ㅇ하여 expandable notification을 enable 하면 된다.
아래는 BigTextStyle()을 이용하여 만든 예제이다
var builder = NotificationCompat.Builder(this, CHANNEL_ID)
        .setSmallIcon(R.drawable.notification_icon)
        .setContentTitle("My notification")
        .setContentText("Much longer text that cannot fit one line...")
        .setStyle(NotificationCompat.BigTextStyle()
                .bigText("Much longer text that cannot fit one line..."))
        .setPriority(NotificationCompat.PRIORITY_DEFAULT)
NotificationCompat.Builder builder = new NotificationCompat.Builder(this, CHANNEL_ID)
.setSmallIcon(R.drawable.notification_icon)
.setContentTitle("My notification")
.setContentText("Much longer text that cannot fit one line...")
.setStyle(new NotificationCompat.BigTextStyle()
.bigText("Much longer text that cannot fit one line..."))
.setPriority(NotificationCompat.PRIORITY_DEFAULT);
Create Channel 채널 만들기
자 Content를 설정하였으니 이번에는 채널을 만들어 보자.
앱에다 채널을 등록하는법은 NotificationChenel의 인스턴스를 넘겨주는 것이다
private fun createNotificationChannel() {
    // Create the NotificationChannel, but only on API 26+ because
    // the NotificationChannel class is new and not in the support library
    if (Build.VERSION.SDK_INT >= Build.VERSION_CODES.O) {
        val name = getString(R.string.channel_name)
        val descriptionText = getString(R.string.channel_description)
        val importance = NotificationManager.IMPORTANCE_DEFAULT
        val channel = NotificationChannel(CHANNEL_ID, name, importance).apply {
            description = descriptionText
        }
        // Register the channel with the system
        val notificationManager: NotificationManager =
            getSystemService(Context.NOTIFICATION_SERVICE) as NotificationManager
        notificationManager.createNotificationChannel(channel)
    }
}
private void createNotificationChannel() {
// Create the NotificationChannel, but only on API 26+ because
// the NotificationChannel class is new and not in the support library
if (Build.VERSION.SDK_INT >= Build.VERSION_CODES.O) {
CharSequence name = getString(R.string.channel_name);
String description = getString(R.string.channel_description);
int importance = NotificationManager.IMPORTANCE_DEFAULT;
NotificationChannel channel = new NotificationChannel(CHANNEL_ID, name, importance);
channel.setDescription(description);
// Register the channel with the system; you can't change the importance
// or other notification behaviors after this
NotificationManager notificationManager = getSystemService(NotificationManager.class);
notificationManager.createNotificationChannel(channel);
}
}
안드로이드 공식문서에서 위 코드는 알림을 만들때 마다 매번 실행되도 상관없다고 나와있다. 이미 존재하는 채널을 다시 create하면 아무일도 안 일어나기 때문.
위 예제에서 importance 라는 변수가 있다. 이는 앞서 설명한 channel importance를 나타낸다.
앞서 설명한것 처럼 8.0 이상에서 채널 임포턴스를 사용하며 7.0 이하의 버전과 호환을 위해서는 setPriority도 같이 사용해야한다.
코드상에서 우리가 priority의 등급을 정해줘도 안드로이드 시스템에서, 혹은 유저가 직접 priority를 조절 할 수 있으므로 항상 설정한대로 동작하지 않음을 기억하자
set the notification's tap action 알림을 탭할 때 생기는 action 만들기
우리가 앱의 알림을 누르면 보통 앱이 열리는 걸 보았을 것이다. 이러한 액션을 추가하는 방법은 PendingIntent 객체를 setContentIntent() 함수에 넘겨주는 것이다
// Create an explicit intent for an Activity in your app
Intent intent = new Intent(this, AlertDetails.class);
intent.setFlags(Intent.FLAG_ACTIVITY_NEW_TASK | Intent.FLAG_ACTIVITY_CLEAR_TASK);
PendingIntent pendingIntent = PendingIntent.getActivity(this, 0, intent, 0, PendingIntent.FLAG_IMMUTABLE);

NotificationCompat.Builder builder = new NotificationCompat.Builder(this, CHANNEL_ID)
        .setSmallIcon(R.drawable.notification_icon)
        .setContentTitle("My notification")
        .setContentText("Hello World!")
        .setPriority(NotificationCompat.PRIORITY_DEFAULT)
        // Set the intent that will fire when the user taps the notification
        .setContentIntent(pendingIntent)
        .setAutoCancel(true);
여기서 setFlags를 보면 PendingIntent.FLAG_IMMUTABLE 라는게 있는데 S-OS(API level 31) 이상부터
PendingIntent.FLAG_IMMUTABLE, PendingIntent.FLAG_MUTABLE 둘중하나는 필수적으로 적어주어야 한다.
setAutoCancel(true)는 유저가 알림을 탭 하였을 때 알림을 지워주는 함수이다.
3. Require an unlocked device 디바이스 언락 요구
앞서 배운것 처럼 락스크린에서 알림을 보여줄 때 내용물을 보려면 디바이스 언락을 요구 할 수 있다.
이는 setAuthenicationRequired() 함수에 true 값을 전달해주어 구현 가능하다.
kotlin
val moreSecureNotification = Notification.Builder(
        context, NotificationListenerVerifierActivity.TAG)
    .addAction(...)

    // This notification always requests authentication when invoked
    // from a lock screen.
    .setAuthenticationRequired(true)
    .build()
java
Notification moreSecureNotification = new Notification.Builder(
        context, NotificationListenerVerifierActivity.TAG)
    .addAction(...)

    // This notification always requests authentication when invoked
    // from a lock screen.
    .setAuthenticationRequired(true)
    .build();
4. Expandable Notification
기본적으로 알림은 한줄로 표시된다. 만약 좀더 긴 알림을 만들고 싶다면 expandable notification을 이용하면 된다.
아래 링크를 참고하여 구현하면 되며 따로 정리할 예정이다
https://developer.android.com/training/notify-user/expanded
확장형 알림 만들기 | Android 개발자 | Android Developers
확장형 알림 만들기 기본 알림에는 일반적으로 제목, 텍스트 행, 사용자가 응답으로 실행할 수 있는 하나 이상의 작업이 포함됩니다. 훨씬 더 많은 정보를 제공하기 위해 이 페이지에 설명된 대
developer.android.com
5. Notification Update and groups 알림 업데이트와 그륩핑
알림의 내용이 업데이트 되었다고 치자. 매번 업데이트 될 때 마다 알림을 새로 보내는건 그리 좋은 생각은 아니다.
알림을 업데이트 해 주거나 inbox-style notification을 이용하는게 더 올바른 선택이다.
update
알림을 업데이트 해주는 방법은 업데이트가 있을 때 마다 NotificationManagerCompat.notify()를 콜 해주면 된다.
inbox style
여러개의 summary lines을 notification에 추가하고 싶을 때 사용한다. 사용법은 setStyle()에 InboxStyle을 추가하고
addLine() 함수를 통하여 메세지를 추가하면 된다.
kotlin
var notification = NotificationCompat.Builder(context, CHANNEL_ID)
        .setSmallIcon(R.drawable.new_mail)
        .setContentTitle("5 New mails from " + sender.toString())
        .setContentText(subject)
        .setLargeIcon(aBitmap)
        .setStyle(NotificationCompat.InboxStyle()
                .addLine(messageSnippet1)
                .addLine(messageSnippet2))
        .build()
java
Notification notification = new NotificationCompat.Builder(context, CHANNEL_ID)
        .setSmallIcon(R.drawable.new_mail)
        .setContentTitle("5 New mails from " + sender.toString())
        .setContentText(subject)
        .setLargeIcon(aBitmap)
        .setStyle(new NotificationCompat.InboxStyle()
                .addLine(messageSnippet1)
                .addLine(messageSnippet2))
        .build();
댓글