https://developer.android.com/guide/topics/providers/content-providers
콘텐츠 제공자 | Android 개발자 | Android Developers
Content providers manage access to a structured set of data. They encapsulate the data, and provide mechanisms for defining data security. Content providers are the standard interface that connects data in one process with code running in another process
developer.android.com
1. Content Provider란?
컨텐트 프로바이더란 간단히 말해 안드로이드에서 다른앱과 데이터를 교류할 때 사용되는 수단입니다.
아래 그림은 컨텐트 프로바이더를 이용해 데이터를 공유하는 그림입니다.

데이터를 다른앱과 공유할 생각이 있다면 Content Provider를 사용하면 됩니다.(다른말로 추상화된 클래스를 구현)
데이터를 공유할 생각이 없어 컨텐트 프로바이더를 구현하지 않는다 해도 추상화 클래스가 이미 잘 작성되어 있어 여전히 사용 가능합니다.
2. Content Provider와 연관된 클래스
아래 항목들은 컨텐트 프로바이더와 연관된 클래스들 입니다
- AbstractThreadedSyncAdapter
- CursorAdapter
- CursorLoader
위 클래스들을 사용하고 싶다면 Content Provider를 구현해야 합니다.
3. Content Provider를 구현해야 하는 케이스 세가지
아래 세가지 케이스는 컨텐트 프로바이더를 구현해야 하는 세가지 케이스 입니다
- 앱에서 커스텀 search sugestion을 구현하고 싶을 경우
- 위젯에 컨텐트 프로바이더를 이용하여 데이터를 노출시키고 싶을 경우
- 나의 앱에서 다른 앱으로 복잡한 데이터나 파일을 copy and paste 하고 싶을 경우
4. Content Provider Basic
본격적으로 컨텐트 프로바이더에 대해 배워보겠습니다.
컨텐트 프로바이더는 데이터를 외부에 노출시킵니다. 이때 데이터를 노출시키는 형태는 여러가지 릴레이션으로 묶인 관계형 데이터베이스와 비슷합니다.
여기서 데이터베이스처럼 Row와 Column에 대한 개념이 나옵니다
Row는 프로바이더가 제공하는 하나의 데이터 묶음을 객체화 한 것이며
Column은 그 데이터 묶음에서 한 조각의 데이터를 의미합니다.
컨텐트 프로바이더는 아래의 그림처럼 동작합니다

- 데이터를 다른앱과 공유할 수 있습니다
- 위젯에다가 데이터를 전송할 수 있습니다
- 커스텀 search sggestion을 SearchRecentSuggestionsProvider를 이용해 serach framework에 넘겨줄 수 있습니다.
- 서버와 앱의 데이터를 AbstractThreadedSyncAdapter를 이용하여 데이터를 Sync하여 유지할 수 있습니다
- UI에서 CursorLoader를 이용하여 데이터를 loading할 수 있습니다
5. 프로바이더에 접근하는 방법
컨텐트 프로바이더가 제공하는 데이터에 접근하려면, 앱 Context내에서 ContentResolver를 사용해야 합니다.
ContentResolver 객체화된 ContentProvider와 커뮤니케이션 하며
프로바이더 객체는 clients에서 리퀘스트를 받은뒤 results를 return 해줍니다.
ContentResolver는 기본적으로 CRUD 메소드를 제공합니다.
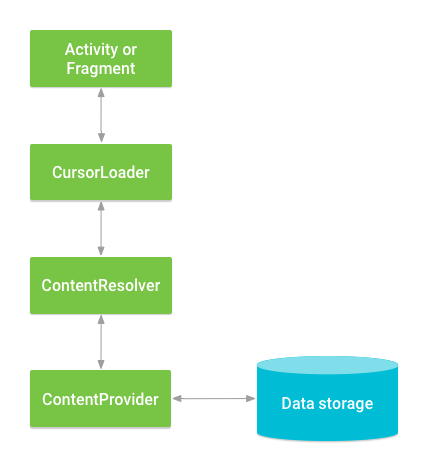
UI에서 ContentProvider에 접근하는 방법은 CursorLoader를 이용하는 것입니다.
그리고 async하게 백그라운드에서 query작업이 수행됩니다.
액티비티나 프래그먼트에서 CursorLoader를 call 한 뒤 쿼리를 날리면 ContentResolver가 ContentProvider를 얻어와 데이터를 액세스 할 수 있습니다.
이런방식을 통해 쿼리가 진행됨과 동시에 사용자에게 UI를 보여줄 수 있습니다.
아래는 위 설명을 나타내는 그림입니다.
자 본격적으로 코드를 이용하여 설명하겠습니다.
먼저 예시를 하나 들겠습니다. 안드로이드에서는 기본적으로 built-in 프로바이더가 여럿 있습니다.
그중 하나는 user dictionary라는 프로바이더입니다. 이 프로바이더는 사전에 없는, 유저가 원하는 단어를 저장하는 프로바이더입니다.
이 프로바이더의 table 형태가 아래와 같이 생겼다고 가정해 봅시다.
Table 1: Sample user dictionary table.
| wordapp | id | frequency | locale | _ID |
| mapreduce | user1 | 100 | en_US | 1 |
| precompiler | user14 | 200 | fr_FR | 2 |
| applet | user2 | 225 | fr_CA | 3 |
| const | user1 | 255 | pt_BR | 4 |
| int | user5 | 100 | en_UK | 5 |
앞서 row와 column에 대한 개념을 배웠습니다.
위 테이블의 하나의 row는 프로바이더가 제공하는 데이터묶음의 객체이며 column은 각각의 데이터들을 의미합니다.
자 그럼 테이블에서 이제 쿼리를 이용해 데이터를 꺼내 볼 까요?
프로바이더에 쿼리를 하는 방법은 ContentResolver.query() 메소드를 이용하는 것 입니다.
ContentResolver.query() 메소드는 ContentProvider.query() 메소드를 호출하게 되고 이에 데이터를 읽어들입니다.
Kotlin
// Queries the user dictionary and returns results
cursor = contentResolver.query(
        UserDictionary.Words.CONTENT_URI,   // 테이블의 주소, URI
        projection,                        // 선택해줄 column, String배열
        selectionClause,                   // 쿼리의 조건문
        selectionArgs.toTypedArray(),      // 쿼리의 조건문의 argument, 물음표를 대체할 값들
        sortOrder                          // 쿼리 소팅 조건
)
Java
// Queries the user dictionary and returns results
cursor = getContentResolver().query(
    UserDictionary.Words.CONTENT_URI,   // 테이블의 주소, URI
    projection,                        // 선택해줄 column, String배열
    selectionClause,                   // 쿼리의 조건문
    selectionArgs,                     // 쿼리의 조건문의 argument, 물음표를 대체할 값들
    sortOrder);                        // 쿼리 소팅 조건
위 query 함수의 인풋 인자를 분석해 보겠습니다.
1. Uri
간단합니다. 테이블의 주소를 의미합니다.
SQL문으로 치자면 FROM table_name 과 동일한 개념입니다.
2. projection
어떤 colume을 선택할 지 나타냅니다. 데이터타입은 String[] 문자열 배열입니다!
SQL문으로 치면 SELECT col1, col2, .... WHERE ....... FROM table_name 에서 col 부분에 해당하빈다!
3. selectionClause
SQL문의 WHERE 조건문입니다. 데이터타입은 문자열입니다
SELECT col1, col2, ... WHERE col1 = ?, col2 = ? FROM table_name
여기서 WHERE 문은 색을 칠하지 않았죠? 문자열에 WHERE은 넣지 않는다는 것 기억해두세요!
4. SelectionArgs
위 조건문에 제가 물음표 ? 를 넣은걸 보실 수 있습니다. 데이터타입은 String[] 문자열 배열입니다!
selectionArgs는 저 물음표를 대체할 파라미터를 넣는 곳 입니다!
5. sortOrder
쿼리문의 sorting을 결정해주는 인풋입니다.
간단한 예제를 들어볼까요?
나의 전화번호부에 붕어의 전화번호를 가져오고 싶다고 가정합시다.
그리고 결과물을 이름 기준으로 내림차순 하고 싶고요.
SQL문으로는 다음과 같이 정의되겠지요
SELECT 이름, 전화번호 FROM 나의 전화번호부 WHERE 이름 = 붕어 ORDER BY 이름 DESC
이를 ContentResolver를 이용하면 다음과 같이 됩니다.
// Queries the user dictionary and returns results
cursor = getContentResolver().query(
    "나의 전화번호부",               // 테이블의 주소, URI
    new String[]{"이름","전화번호"}, // 선택해줄 column, String배열
    {"이름 = ?"},                    // 쿼리의 조건문
    new String[]{"붕어"},            // 쿼리의 조건문의 argument, 물음표를 대체할 값들
    "이름"+" DESC");                 // 쿼리 소팅 조건
그럼 여기서 질문. select all 하려면 어떻게 해야 할 까요?
정답은 테이블 주소 빼고 전부다 null을 넣어주면 됩니다
// Queries the user dictionary and returns results
cursor = getContentResolver().query(
    "나의 전화번호부",   // 테이블의 주소, URI
    null},                        // 선택해줄 column, String배열
    null,                   // 쿼리의 조건문
    null,                   // 쿼리의 조건문의 argument, 물음표를 대체할 값들
    null);                  // 쿼리 소팅 조건
쉽쥬?
6. Cursor에 대한 개념
이제 여러분은 ContentResolver를 이용하여 쿼리를 하는 방법에 대해 배웠습니다.
이번에는 커서에 대해 배워 볼 텐데요
ContentResolver.query() 메소드는 항상 Cursor 라는걸 리턴합니다.
이름만 봐도 이게 뭐하는지 감이오시죠?
query를 하여 나온 테이블의 row를 가르키는것이라고 생각하시면 됩니다!
Cursor를 이용하여 이 row들을 순회할 수도 있지요
자 이제 몇가지 사용 예시를 들겠습니다.
쿼리한 데이터의 수 가져오기
쿼리를 하면 결과가 몇개 나왔는지 궁금하겠지요? 이는 Cursor.getCount() 메소드를 이용하면 됩니다.
커서와 리스트뷰
Cursor는 "list" of rows 입니다. 즉 row의 리스트라는 얘기이지요. 보통 이를 화면에 보여주고 싶을 때 ListView를 이용합니다.
ListView와 Cursor를 연결 해 줄 때 SimpleCursorAdapter 라는것을 이용합니다.
kotlin
// Defines a list of columns to retrieve from the Cursor and load into an output row
val wordListColumns : Array<String> = arrayOf(
        UserDictionary.Words.WORD,      // Contract class constant containing the word column name
        UserDictionary.Words.LOCALE     // Contract class constant containing the locale column name
)

// Defines a list of View IDs that will receive the Cursor columns for each row
val wordListItems = intArrayOf(R.id.dictWord, R.id.locale)

// Creates a new SimpleCursorAdapter
cursorAdapter = SimpleCursorAdapter(
        applicationContext,             // The application's Context object
        R.layout.wordlistrow,           // A layout in XML for one row in the ListView
        mCursor,                        // The result from the query
        wordListColumns,               // A string array of column names in the cursor
        wordListItems,                 // An integer array of view IDs in the row layout
        0                               // Flags (usually none are needed)
)

// Sets the adapter for the ListView
wordList.setAdapter(cursorAdapter)
Java
// Defines a list of columns to retrieve from the Cursor and load into an output row
String[] wordListColumns =
{
    UserDictionary.Words.WORD,   // Contract class constant containing the word column name
    UserDictionary.Words.LOCALE  // Contract class constant containing the locale column name
};

// Defines a list of View IDs that will receive the Cursor columns for each row
int[] wordListItems = { R.id.dictWord, R.id.locale};

// Creates a new SimpleCursorAdapter
cursorAdapter = new SimpleCursorAdapter(
    getApplicationContext(),               // The application's Context object
    R.layout.wordlistrow,                  // A layout in XML for one row in the ListView
    mCursor,                               // The result from the query
    wordListColumns,                      // A string array of column names in the cursor
    wordListItems,                        // An integer array of view IDs in the row layout
    0);                                    // Flags (usually none are needed)

// Sets the adapter for the ListView
wordList.setAdapter(cursorAdapter);
쿼리 결과 데이터 순회 하기
kotlin
mCursor?.apply {
	// 테이블 이름으로 컬럼의 인덱스를 받아온다
    val index: Int = getColumnIndex(UserDictionary.Words.WORD)

    // 커서를 움직인다.
    // 커서가 처음 움직이기 전에 커서는 -1을 가리킨다.
    // 이 상태에서 데이터를 얻어오려하면 exception 나므로 주의
    while (moveToNext()) {
        // 컬럼에서 데이터를 가져온다
        newWord = getString(index)

        // 이후 하고싶은 코드 실행

        ...

        // end of while loop
    }
}
java
// 테이블 이름으로 컬럼의 인덱스를 받아온다
int index = mCursor.getColumnIndex(UserDictionary.Words.WORD);


if (mCursor != null) {
    // 커서를 움직인다.
    // 커서가 처음 움직이기 전에 커서는 -1을 가리킨다.
    // 이 상태에서 데이터를 얻어오려하면 exception 나므로 주의
    while (mCursor.moveToNext()) {

        // 컬럼에서 데이터를 가져온다
        newWord = mCursor.getString(index);

        // 이후 하고싶은 코드 실행
        ...

        // end of while loop
    }
} else {

    // Insert code here to report an error if the cursor is null or the provider threw an exception.
}
7. Content Provider의 권한 설정
공식문서에 나온 내용은 약간 옛날 내용이다.
Content Provider의 쿼리를 수행하기 위해서는 Manifest에서 두가지 권한설정이 필요하다
<uses-permission android:name="패키지네임.READ_WRITE"/>

..............

<queries>
    <package android:name="패키지네임"/>
</queries>
8. ContentProvider의 insert, update, delete
데이터 Inserting
사용법은 간단하다
- ContentValues 객체를 선언한다
- 컬럼이름을 key값으로 하여 key, value로 값을 담는다
- ContentResolver.insert() 메소드를 이용한다
Kotlin
//insert의 결과를 받기 위한 Uri를 선언한다
lateinit var newUri: Uri

...

// insert할 데이터를 담을 ContentValues 객체를 선언한다

val newValues = ContentValues().apply {
	// 컬럼이름을 key값으로 하여 key, value 값을 담는다
    put(UserDictionary.Words.APP_ID, "example.user")
    put(UserDictionary.Words.LOCALE, "en_US")
    put(UserDictionary.Words.WORD, "insert")
    put(UserDictionary.Words.FREQUENCY, "100")

}
//insert를 실행한다

newUri = contentResolver.insert(
        UserDictionary.Words.CONTENT_URI,   // the user dictionary content URI
        newValues                          // the values to insert
)
Java
//insert의 결과를 받기 위한 Uri를 선언한다
Uri newUri;

...

// insert할 데이터를 담을 ContentValues 객체를 선언한다
ContentValues newValues = new ContentValues();

// 컬럼이름을 key값으로 하여 key, value 값을 담는다
newValues.put(UserDictionary.Words.APP_ID, "example.user");
newValues.put(UserDictionary.Words.LOCALE, "en_US");
newValues.put(UserDictionary.Words.WORD, "insert");
newValues.put(UserDictionary.Words.FREQUENCY, "100");

//insert를 실행한다
newUri = getContentResolver().insert(
    UserDictionary.Words.CONTENT_URI,   // the user dictionary content URI
    newValues                          // the values to insert
);
참고사항
만약 Column값에 null을 넣고 싶다면 ContentValues.putNull()을 이용하자
위 코드에서 앞선 설명에 추가하여 newUri로 insert의 결과를 받고 있는것을 볼 수 있다
기본적으로 데이터베이스 테이블들은 _ID 값을 primary key로 설정하여 데이터를 관리한다
여기서 newUri는 아래와 같은 foramt 형태로 되어있다
content://user_dictionary/words/<id_value>여기서 id_value는 insert된 데이터의 row의 _ID를 가리킨다.
대부분의 프로바이더는 이런형태의 URI로 row를 찾아서 특정한 작업을 수행할 수 있다는 것을 기억하자
Uri로부터 _ID 값을 가져오고 싶다면, ContentUris.parseID()를 이용하면 된다.
데이터 Update
데이터의 업데이트도 insert와 유사하다
- ContentValues를 선언하여 업데이트할 값을 만든다
- query형태로 업데이트 할 데이터들을 선택한다
아래는 locale 컬럼에서 en_ 을 포함하고 있는 값들을 전부 null로 바꿔주는 코드이다
kotlin
// 업데이트할 값을 선언
val updateValues = ContentValues().apply {
	// locale 컬럼에 null을 넣어줌
    putNull(UserDictionary.Words.LOCALE)
}

// selection 문장을 만들어 준다
val selectionClause: String = UserDictionary.Words.LOCALE + "LIKE ?"
val selectionArgs: Array<String> = arrayOf("en_%")

// 몇개의 row가 업데이트 되어있는지 세어주기 위한 int값 선언
var rowsUpdated: Int = 0

...

rowsUpdated = contentResolver.update(
        UserDictionary.Words.CONTENT_URI,   // the user dictionary content URI
        updateValues,                      // the columns to update
        selectionClause,                   // the column to select on
        selectionArgs                      // the value to compare to
)
Java
// 업데이트할 값을 선언
ContentValues updateValues = new ContentValues();

// selection 문장을 만들어 준다
String selectionClause = UserDictionary.Words.LOCALE +  " LIKE ?";
String[] selectionArgs = {"en_%"};

// 몇개의 row가 업데이트 되어있는지 세어주기 위한 int값 선언
int rowsUpdated = 0;

...

// locale 컬럼에 null을 넣어줌
updateValues.putNull(UserDictionary.Words.LOCALE);

rowsUpdated = getContentResolver().update(
    UserDictionary.Words.CONTENT_URI,   // the user dictionary content URI
    updateValues,                      // the columns to update
    selectionClause,                   // the column to select on
    selectionArgs                      // the value to compare to
);
위 update의 내용을 SQL문으로 작성해보면 다음과 같다
UPDATE UserDictionary SET locale=null WHERE locale LIKE 'en_%'
여기서 WHERE locale LIKE 'en_%' 는 locale 컬럼이 en_ 로 시작하는 값을 찾으라는 의미이다
데이터 Delete
Delete는 더욱 쉽다. 데이터를 지워줄 쿼리 조건문만 작성하면 된다!
Kotlin
// 지워줄 컬럼의 조건문 작성
val selectionClause = "${UserDictionary.Words.APP_ID} LIKE ?"
val selectionArgs: Array<String> = arrayOf("user")

// 몇개가 지워졌는지 확인
var rowsDeleted: Int = 0

...

// 조건문에 만족하는 데이터를 지운다
rowsDeleted = contentResolver.delete(
        UserDictionary.Words.CONTENT_URI,   // the user dictionary content URI
        selectionClause,                   // the column to select on
        selectionArgs                      // the value to compare to
)
Java
// 지워줄 컬럼의 조건문 작성
String selectionClause = UserDictionary.Words.APP_ID + " LIKE ?";
String[] selectionArgs = {"user"};

// 몇개가 지워졌는지 확인
int rowsDeleted = 0;

...

// 조건문에 만족하는 데이터를 지운다
rowsDeleted = getContentResolver().delete(
    UserDictionary.Words.CONTENT_URI,   // the user dictionary content URI
    selectionClause,                   // the column to select on
    selectionArgs                      // the value to compare to
);'Android > 안드로이드 기본지식' 카테고리의 다른 글
| [Android] Canvas를 이용하여 UI 그리기 (0) | 2022.04.14 |
|---|---|
| [Android] Custom View 만들기 (0) | 2022.04.13 |
| [Android] Task와 back stack (0) | 2022.02.17 |
| 안드로이드 inflate, inflater란? (0) | 2021.07.19 |
| 안드로이드 onSaveInstanceState (0) | 2021.07.08 |


댓글