https://developer.android.com/develop/ui/views/graphics/opengl/about-opengl
OpenGL ES | Android Developers
OpenGL ES Stay organized with collections Save and categorize content based on your preferences. Android includes support for high performance 2D and 3D graphics with the Open Graphics Library (OpenGL®), specifically, the OpenGL ES API. OpenGL is a cross-
developer.android.com
1. OpenGL 기초
안드로이드에서 아래는 opengl에서 두가지 중요한 클래스이다.
GLSurfaceView
opengl을 통해 그려지는 대상이 되는 view이다. 이놈은 객체 생성할 때 Renderer라는 놈을 붙여주어야 한다. 터치이벤트를 받으려면 따로 onTouchEvent메소드 implement 해주어야 한다.
GLSurfaceView.Renderer
OpenGL로 그래픽을 그려주는 메소드를 define하는 인터페이스. GLSurfaceView.setRenderer 메소드로 SurfaceView에 붙여주어야 한다. 렌더러는 다음 세가지의 메소드를 implement 해야한다
- onSurfaceCreated() : GLSurfaceView가 생성될 때 한번만 불리는 메소드. OpenGL Parameter 변수 초기화나 graphic object를 초기화 하는 작업을 한다.
- onDrawFrame() : GLSurfaceView에 그릴 때 마다 불리는 메소드. 이 메소드가 GL로 그릴 때 가장 핵심으로 생각해야 하며, graphic object를 그리는 로직을 구현해야 한다.
- onSurfaceChanged() : GLSurfaceView의 Geometry가 변경될 때 불리는 메소드이다. GLSurfaceView의 사이즈나, orientation이 변경 될 때 호출된다.
2. 매니페스트 선언
당연하겠지만 opengl을 사용하려면 manifest에 선언해주어야 한다. 원하는 버전에 맞추어 추가해주자.
<!-- Tell the system this app requires OpenGL ES 2.0. -->
<uses-feature android:glEsVersion="0x00020000" android:required="true" />

<!-- Tell the system this app requires OpenGL ES 3.0. -->
<uses-feature android:glEsVersion="0x00030000" android:required="true" />

<!-- Tell the system this app requires OpenGL ES 3.1. -->
<uses-feature android:glEsVersion="0x00030001" android:required="true" />
3. OpenGL에서 가장 중요하게 생각할 문제 Projection
opengl은 렌더링할 때 대상이 아주 이쁜 정사각형이라고 생각한다. 하지만 안드로이드 디바이스는 제각기 모양이 다르고 사이즈도 다르다.
opengl로 렌더링 한걸 실제 디스플레이에 맵핑하는건 아주 중요한 문제이다.
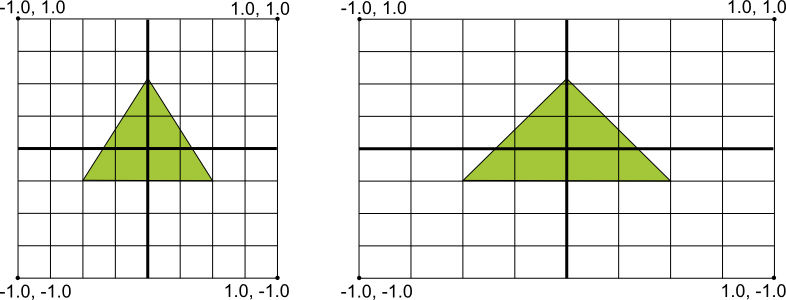
위 그림은 앞서 설명한 문제상황을 잘 보여준다. 왼쪽의 그림은 opengl이 생각하는 렌더링 대상이고, 오른쪽은 실제 디바이스의 디스플레이에 맵핑되는 모습이다.
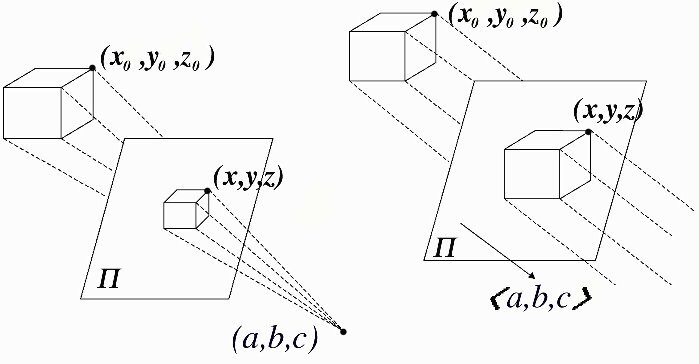
위 문제를 해결하기 위해서는 Projection Matrix와 CameraView Matrix라는걸 만들어서 OpenGL Rendering Pipeline에 적용시켜주어야 한다.
단어의 뜻만 보면 감이오겠지만, opengl은 2D및 3D 그래픽 라이브러리이다. 그런데 실제로 화면에 그려지는것은 2d이므로 이를 Projection해 주어야 한다. Projection을 수행할 위치를 정하는것은 CameraView이다.
자 여기서 한가지 주목할점이 있다. 위 좌표의 범위가 -1에서 1이다. 즉 OpenGL은 좌표를 -1에서 1 사이로 normalizing한다.
(여기까지 이해했다면 아래 내용은 그냥 스킵합시다)
OpenGL ES 1.0
Projection Matrix는 아래와 같이 GLSurfaceView.Render의 onSurfaceChanged() 메소드에 적용할 수 있다. 여기서 glViewport는 opengl이 그릴 도화지같은 것 이라고 생각하면 된다. width와 height가 주어지면 거기서 ratio를 구한뒤 이를 반영해준다. 그러면 적절한 위치에 맵핑이 된다.
Projection에는 두가지 모드가 있다.
- Perspective Projection : 원근법이 적용된 Projection이다. gluPerspective() 혹은 glFrustum()을 사용한다.
- Orthographic Projection : 원근법이 없는 Projection 즉 직교투영이다. Pararell Projection이라고 불리기도 한다. glOrtho()메소드를 사용한다.
아래 예제는 ES 1.0에서 사용한 예시. 행렬 계산법은 머리아프니 따로 검색해서 공부하도록 하자.
public void onSurfaceChanged(GL10 gl, int width, int height) {
    gl.glViewport(0, 0, width, height);

    // make adjustments for screen ratio
    float ratio = (float) width / height;
    gl.glMatrixMode(GL10.GL_PROJECTION);        // set matrix to projection mode
    gl.glLoadIdentity();                        // reset the matrix to its default state
    gl.glFrustumf(-ratio, ratio, -1, 1, 3, 7);  // apply the projection matrix
}
카메라 매트릭스는 GLSurfaceView.Renderer의 onDrawFrame()에서 설정한다. GLU.gluLookAt()메소드를 이용해서 카메라 위치를 정해준다.
public void onDrawFrame(GL10 gl) {
    ...
    // Set GL_MODELVIEW transformation mode
    gl.glMatrixMode(GL10.GL_MODELVIEW);
    gl.glLoadIdentity();                      // reset the matrix to its default state

    // When using GL_MODELVIEW, you must set the camera view
    GLU.gluLookAt(gl, 0, 0, -5, 0f, 0f, 0f, 0f, 1.0f, 0.0f);
    ...
}
4. 본격적인 튜토리얼
먼저 들어가기 전에 아래의 용어들을 인지하고 가자
- 버텍스(vertext) : 좌표를 의미한다
- 쉐이더(shader) : 하나의 작은 실행단위이다. 한마디로 코드라는 뜻. 대충 형태가 c언어 처음 배울 때 헬로월드 처럼 작성된다.
- 버텍스 쉐이더 : 좌표를 계산해주는 쉐이더이다.
- 프래그먼트 쉐이더 : 색상을 계산해주는 쉐이더이다.
- 프로그램 : 쉐이더들이 모여서 생긴 하나의 집합 개념
먼저 앞서 배운대로 opengl을 사용하기 위해서 manifest에 설정을 해 주어야 한다.
<uses-feature android:glEsVersion="0x00020000" android:required="true" />그리고 만약에 opengl에서 texture compression을 사용할 거라면 아래처럼 각 compression당 따로 선언을 해 주어야 한다.
(이게 뭔소린가 싶으면 일단 하지말고 나중에 에러날 때 집어 넣으면 될듯함)
<supports-gl-texture android:name="GL_OES_compressed_ETC1_RGB8_texture" />
<supports-gl-texture android:name="GL_OES_compressed_paletted_texture" />
이제 본격적으로 액티비티를 만들어보자.
만약 OpenGL을 이미 사용하고 있는 레이아웃 사이에 넣을거라면 TextureView 사용법을 알아야 한다.
하지만 공식문서 예제는 일단 OpenGL만 사용하는 케이스를 설명하니 그리 가겠음. 아래처럼 GLSurfaceView를 액티비티의 setContentView로 정의해주자.
OpenGLES20Activity.java
public class OpenGLES20Activity extends Activity {

    private GLSurfaceView gLView;

    @Override
    public void onCreate(Bundle savedInstanceState) {
        super.onCreate(savedInstanceState);

        // Create a GLSurfaceView instance and set it
        // as the ContentView for this Activity.
        gLView = new MyGLSurfaceView(this);
        setContentView(gLView);
    }
}
다음으로 실제 GLView를 만들어보자. 앞서 배운것 처럼 GLView는 안에다가 렌더러를 포함해야 한다.
MyGLSurfaceView.java
import android.content.Context;
import android.opengl.GLSurfaceView;

class MyGLSurfaceView extends GLSurfaceView {

    private final MyGLRenderer renderer;

    public MyGLSurfaceView(Context context){
        super(context);

        // Create an OpenGL ES 2.0 context
        setEGLContextClientVersion(2);

        renderer = new MyGLRenderer();

        // Set the Renderer for drawing on the GLSurfaceView
        setRenderer(renderer);
        setRenderMode(GLSurfaceView.RENDERMODE_WHEN_DIRTY);
    }
}
여기서 앞서 배우지 않은 함수 setRenderMode라는게 있다. 이 함수를 통해 dirty라고 설정해주면 GLView의 drawing data가 변했을 때만 drawing 된다. GLView를 다시 그리려면 requestRederer를 호출하면 된다.
자 마지막으로 Render를 작성해주자
MyGLRenderer.javaj
import javax.microedition.khronos.egl.EGLConfig;
import javax.microedition.khronos.opengles.GL10;

import android.opengl.GLES20;
import android.opengl.GLSurfaceView;

public class MyGLRenderer implements GLSurfaceView.Renderer {

    public void onSurfaceCreated(GL10 unused, EGLConfig config) {
        // Set the background frame color
        GLES20.glClearColor(0.0f, 0.0f, 0.0f, 1.0f);
    }

    public void onDrawFrame(GL10 unused) {
        // Redraw background color
        GLES20.glClear(GLES20.GL_COLOR_BUFFER_BIT);
    }

    public void onSurfaceChanged(GL10 unused, int width, int height) {
        GLES20.glViewport(0, 0, width, height);
    }
}
glViewport는 OpenGL이 그릴 대상의 영역을 지정하는 함수이다.
이로써 기초단계가 완성되었다. 아마 실행해보면 검은 화면만 나올것이다. 다음 튜토리얼을 통해 진짜 무언가를 해 보자.
'Android > Graphics' 카테고리의 다른 글
| [Android] Graphics Architecture (0) | 2022.07.08 |
|---|---|
| [Android] Graphics Overview (0) | 2022.07.08 |

댓글