자 이제 여러분은 Model Template View 짜는 법을 모두 배웠습니다.
이제 본격적으로 polls 앱을 만들어 보도록 하겠습니다.
먼저 데이터베이스에 Question과 Choice를 만들어 줍시다.
이전에 배운 admin 페이지를 이용해서 만들어 보겠습니다.
먼저 이전 튜토리얼에서 배운 __str__(self) redefinition 하여 admin페이지에 데이터가 나오도록 합니다.

admin페이지로 가서 이전 데이터는 정리하고 Question 하나를 추가 해 줍니다.

Choice도 추가해줍니다.


이번에는 detail 템플릿을 완성시켜 봅시다.
polls/templates/polls/detail.html
<h1>{{ question.question_text }}</h1>

{% if error_message %}<p><strong>{{ error_message }}</strong></p>{% endif %}

<form action="{% url 'polls:vote' question.id %}" method="post">
{% csrf_token %}
{% for choice in question.choice_set.all %}
    <input type="radio" name="choice" id="choice{{ forloop.counter }}" value="{{ choice.id }}">
    <label for="choice{{ forloop.counter }}">{{ choice.choice_text }}</label><br>
{% endfor %}
<input type="submit" value="Vote">
</form>- 위 템플릿은 투표를 하는 기능을 넣은 템플릿입니다. form 태그를 이용합니다
- form에서 라디오 버튼을 이용해 데이터를 선택합니다. 이 데이터는 POST request로 vote뷰에 전송됩니다.
- forloop.counter는 for문이 얼마나 돌았는지 나타내줍니다
- csrf_token은 장고에서 제공해주는 보안기능입니다. csrf 보안에 대해 딱히 걱정안하고 이 태그만 이용하시면 됩니다
하기 코드 이제 분석하실수 있겠죠? polls:vote는 vote view에 form 데이터를 전송하라는 의미입니다!
<form action="{% url 'polls:vote' question.id %}" method="post">
서버를 돌린뒤 확인하면 이런 페이지가 나옵니다.

자 이제 vote view를 구현하러 갑시다!
polls/views.py
from django.http import HttpResponse, HttpResponseRedirect
from django.shortcuts import get_object_or_404, render
from django.urls import reverse

from .models import Choice, Question
# ...
def vote(request, question_id):
    question = get_object_or_404(Question, pk=question_id)
    try:
        selected_choice = question.choice_set.get(pk=request.POST['choice'])#key, value값으로 데이터 받아옴
    except (KeyError, Choice.DoesNotExist):
        # Redisplay the question voting form.
        return render(request, 'polls/detail.html', {
            'question': question,
            'error_message': "You didn't select a choice.",
        })
    else:
        selected_choice.votes += 1
        selected_choice.save()
        # Always return an HttpResponseRedirect after successfully dealing
        # with POST data. This prevents data from being posted twice if a
        # user hits the Back button.
        return HttpResponseRedirect(reverse('polls:results', args=(question.id,)))
자 form에서 우리가 submit 버튼을 누르면 POST request로 vote view에 데이터가 전송이 됩니다.
하기 코드가 기억나시나요?
<input type="radio" name="choice" id="choice{{ forloop.counter }}" value="{{ choice.id }}">
form에서 데이터를 장고에 전송할떄 key, value 형태로 전송이 됩니다.
여기서 key값은 name이 되며 value는 value 입니다.
try:
    selected_choice = question.choice_set.get(pk=request.POST['choice'])#key, value값으로 데이터 받아옴
request.POST["키 값"] 혹은 request.POST.get("키 값") 형태로 데이터를 얻어 올 수 있습니다.
위 코드는 question 모델에 연결된 choice 데이터에서 choice.id 값을 이용해 선택된 choice를 받아오는 코드입니다.
except (KeyError, Choice.DoesNotExist):
        # Redisplay the question voting form.
        return render(request, 'polls/detail.html', {
            'question': question,
            'error_message': "You didn't select a choice.",
POST에서 데이터 받아오는게 실패하면 except 코드가 수행됩니다. detail뷰로 넘어가면서 error_message를 따로 담아서 보내네요.
else:
    selected_choice.votes += 1
    selected_choice.save()
    # Always return an HttpResponseRedirect after successfully dealing
    # with POST data. This prevents data from being posted twice if a
    # user hits the Back button.
    return HttpResponseRedirect(reverse('polls:results', args=(question.id,)))
except가 수행되지 않으면 else문이 수행됩니다. 즉 POST에서 원하는 데이터를 받아왔다는 얘기지요.
Django shell에서 데이터를 다루었던 방법처럼 votes 변수에 +1 을 해준뒤 save 해줍니다!
여기서 주목해야 할 점은 아래 코드입니다.
return HttpResponseRedirect(reverse('polls:results', args=(question.id,)))reverse 함수는 polls:results(url의 name)을 url로 거꾸로 바꿔주는 함수입니다. args에는 url에 필요한 변수를 넣어줍시다.
즉 이 코드는 results view로 웹페이지를 띄워달라는 얘기이지요!
자 이제 result view를 작성하러 갑시다
polls/views.py
from django.shortcuts import get_object_or_404, render


def results(request, question_id):
    question = get_object_or_404(Question, pk=question_id)
    return render(request, 'polls/results.html', {'question': question})
polls/templates/polls/results.html
<h1>{{ question.question_text }}</h1>

<ul>
{% for choice in question.choice_set.all %}
    <li>{{ choice.choice_text }} -- {{ choice.votes }} vote{{ choice.votes|pluralize }}</li>
{% endfor %}
</ul>

<a href="{% url 'polls:detail' question.id %}">Vote again?</a>
question_id를 기준으로 질문이 가지는 choice가 몇개가 투표되었는지 나타내주는 템플릿 입니다.
<li>{{ choice.choice_text }} -- {{ choice.votes }} vote{{ choice.votes|pluralize }}</li>
여기서 주목할 부분이 {{ choice.votes|pluralize }} 인데 {{ }}은 template에서 variable을 나태내준다고 했죠?
이 variable 뒤에 | 은 filter라는 기능인데 variable을 특정한 형태로 바꾸어주는 역할을 합니다.
pluralize 즉 복수화 이므로 숫자가 2 이상이면 choice.votes 라는 값을 s 로 바꾸어 줍니다.
즉
choice.votes가 1인 경우 => 1 vote
choice.votes가 2이상인경우 => 2 votes
로 표기해줍니다.
자 서버를 가동시킨뒤 이제 완성된 polls 어플리케이션을 구동해 봅시다.
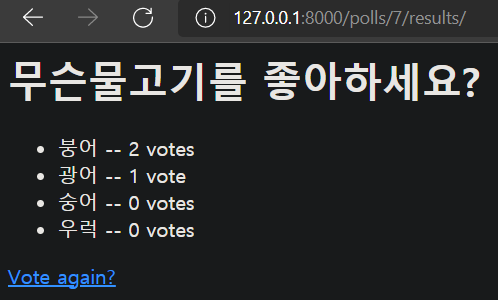
짜잔! 이제 polls 어플리케이션이 완성되었습니다. 1표를 준 광어는 vote라 표시되고 2표를 준 붕어는 votes라 표시되네요.
으음 근데 왜 0표는 votes지... Django는 0이라는 숫자를 복수라고 생각하나 봅니다 하하...
자 이제 모든게 끝났습니다. polls 어플리케이션이 완성되었어요!
하지만 배울게 아직 남아있습니다. 클래스 뷰 라는 건데요.
Django는 파이썬의 철학과 비슷하게 심플한것이 가장 최고다. 코드적은게 최고다 라는 철학을 내세우는데요.
이 클래스뷰 라는게 그러한 철학에서 나온 기능입니다.
클래스 뷰는 다음시간에 배우도록 하겠습니다.
'Django > 튜토리얼' 카테고리의 다른 글
| [Django/장고] 파이썬으로 웹페이지 만들기 튜토리얼 - 5부 (15) | 2021.05.27 |
|---|---|
| [Django/장고] 파이썬으로 웹페이지 만들기 튜토리얼 - 4부 (5) | 2021.05.22 |
| Django/장고] 파이썬으로 웹페이지 만들기 튜토리얼 - 3부 (8) | 2021.05.22 |
| [Django/장고] 파이썬으로 웹페이지 만들기 튜토리얼 - 2부 (7) | 2021.05.22 |
| [Django/장고] 파이썬으로 웹페이지 만들기 튜토리얼 - 1부 (20) | 2021.05.22 |


댓글