LiveData란?
LiveData란 UI에 사용되는 데이터를 저장하는 class이다.
왜씀? 장점이 뭐임?
UI에 사용되는 데이터가 바뀌면 그걸 실시간으로 반영해줌.
가령 내가 TextView에 Hello World! 라고 적었는데 이걸 Hell World!라고 바꿧다고 치자
그럼 나는 이걸 UI에 반영하려면
text = "Hell World!";
textView.setText(text);
라고 적어야 되는데 라이브 데이터를 이용하면
text = "Hell World";
//textView.setText(text); <- 이부분이 필요 없어진다
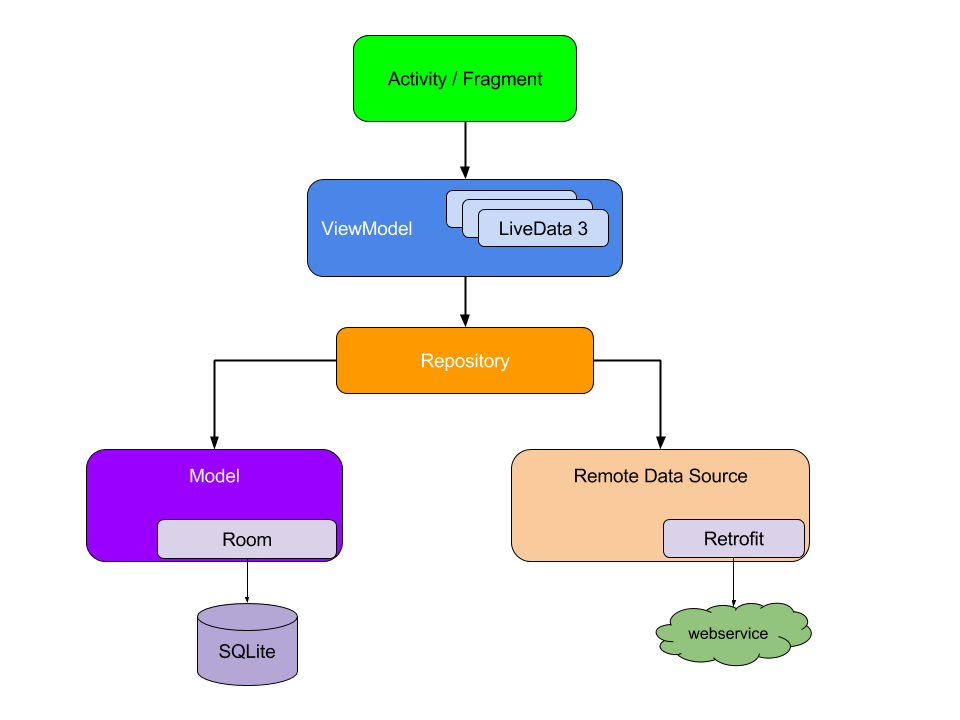
https://developer.android.com/jetpack/guide?hl=ko
위 그림은 안드로이드의 공식문서에서 가져온 그림이다.
앱을 설계할 때 UI와 관련된 데이터는 ViewModel + LiveData로 관리하도록 권장하고 있음
어케씀?
1. UI에 반영할 데이터를 LiveData로 선언하셈. LiveData는 추상클래스이므로 이를 상속한 MutableLiveData로 선언
MutableLiveData<String> boungaCounter = new MutableLiveData<>();
2. Observer라는 놈을 선언하고 onChanged 메소드를 상속하고 라이브데이터에 옵저버를 달아주면 됨
boungaCounter.observe(this, new Observer<String>() {
            @Override
            public void onChanged(String s) {
                TextView textView = findViewById(R.id.boungaCounter);
                textView.setText(s);
            }
        });
이름만 봐도 옵저버가 뭐하는놈인지 대충 감오쥬?
라이브데이터를 관찰하고 있다가 값이 바뀌면 onChanged메소드를 호출해 UI를 바꿔주는 로직을 실행하면 끝~
예제좀
ㅇㅋ

위와 같은 그림이 있음
1. 나는 저 Hello Bounga! 라는 텍스트를 라이브 데이터로 선언할거임
2. 라이브 데이터 값을 바꿔줌. 붕어의 숫자가 올라가도록
3. 그럼 실시간으로 값만 바뀌었는데 내가 따로 작업 안해줘도 UI가 바뀔거임
원래는 ViewModel + LiveData 조합으로 해야 하는데 ViewModel까지 하면 머리 아프니 그냥 LiveData만 적겠음
package com.example.livebounga;

import androidx.appcompat.app.AppCompatActivity;
import androidx.lifecycle.LiveData;
import androidx.lifecycle.MutableLiveData;
import androidx.lifecycle.Observer;

import android.os.Bundle;
import android.widget.Button;
import android.widget.TextView;

public class MainActivity extends AppCompatActivity {

    //LiveData는 abstract class, LiveData를 상속하는 MutableLive 클래스 사용
    MutableLiveData<String> boungaCounter = new MutableLiveData<>();
    private int count = 0;

    @Override
    protected void onCreate(Bundle savedInstanceState) {
        super.onCreate(savedInstanceState);
        setContentView(R.layout.activity_main);
        //이 뷰에서 LiveData의 변화를 감지하고 변화
        boungaCounter.observe(this, new Observer<String>() {
            @Override
            public void onChanged(String s) {
                TextView textView = findViewById(R.id.boungaCounter);
                textView.setText(s);
            }
        });
        Button addBounga = findViewById(R.id.addBoungaButton);

        addBounga.setOnClickListener(v -> {
            boungaCounter.setValue("Number Of Bounga is " + Integer.toString(count++));
        });

    }
}
<?xml version="1.0" encoding="utf-8"?>
<androidx.constraintlayout.widget.ConstraintLayout xmlns:android="http://schemas.android.com/apk/res/android"
xmlns:app="http://schemas.android.com/apk/res-auto"
xmlns:tools="http://schemas.android.com/tools"
android:layout_width="match_parent"
android:layout_height="match_parent"
tools:context=".MainActivity">
<TextView
android:id="@+id/boungaCounter"
android:layout_width="wrap_content"
android:layout_height="wrap_content"
android:text="Hello Bounga!"
android:textSize="30sp"
app:layout_constraintLeft_toLeftOf="parent"
app:layout_constraintRight_toRightOf="parent"
app:layout_constraintTop_toTopOf="parent"
app:layout_constraintBottom_toTopOf="@id/addBoungaButton"
app:layout_constraintVertical_chainStyle="packed"/>
<Button
android:id="@+id/addBoungaButton"
android:layout_width="wrap_content"
android:layout_height="wrap_content"
android:text="add bounga"
app:layout_constraintLeft_toLeftOf="parent"
app:layout_constraintRight_toRightOf="parent"
app:layout_constraintTop_toBottomOf="@id/boungaCounter"
app:layout_constraintBottom_toBottomOf="parent"/>
</androidx.constraintlayout.widget.ConstraintLayout>
결과
- ADD BOUNGA 버튼을 클릭하면 붕어의 숫자가 올라감
- 근데 내가한건 LiveData를 바꿔준거 밖에 없음
- 데이터만 바꾸어 주었는데 UI가 알아서 변함

자 봅시다.
MutableLiveData<String> boungaCounter = new MutableLiveData<>();
Button addBounga = findViewById(R.id.addBoungaButton);

addBounga.setOnClickListener(v -> {
	boungaCounter.setValue("Number Of Bounga is " + Integer.toString(count++));
});
버튼을 클릭하면 나는 LiveData로 선언한 boungaCounter(붕어카운터)의 String을 바꿔주는 로직이 호출됨
어? 라이브 데이터가 바뀌었다???
그럼 라이브데이터에 등록한 옵저버가 값의 변화를 감지하고 onChanged 메소드를 호출!!
boungaCounter.observe(this, new Observer<String>() {
    @Override
    public void onChanged(String s) {
    TextView textView = findViewById(R.id.boungaCounter);
    textView.setText(s);
}
여기서 UI를 바꿔주는 로직이 있어서 textView를 자동으로 바꿔줌
쉽쥬?
자 복습해봅시다.
- LiveData는 UI와 관련된 데이터를 저장하는 class이다.
- LiveData를 이용하면 값만 바꿔줘도 UI가 저절로 바뀐다
- 사용 방법은 LiveData에 Observer라는 클래스를 달아준다
- Observer라는 클래스의 onChanged 메소드는 LiveData의 값의 변화를 감지하면 호출된다
- onChanged 메소드에 UI변경하는 코드를 넣어주면 라이브데이터의 값이 변할때 UI가 자동으로 바뀜!
끝
다음시간에는 ViewModel에 대해서 설명하고 LiveData와 연동하여 사용해 보겠습니다!
'Android > 안드로이드 기본지식' 카테고리의 다른 글
| 안드로이드 inflate, inflater란? (0) | 2021.07.19 |
|---|---|
| 안드로이드 onSaveInstanceState (0) | 2021.07.08 |
| 안드로이드 ViewModel 사용하기 (0) | 2021.07.08 |
| 안드로이드 Fragment 사용하기 (0) | 2021.06.30 |
| [Android] kotlin에서 안드로이드 Fragment 제거하기 (0) | 2021.06.14 |


댓글